1. Cookie Sheet Magnetic Spice Rack
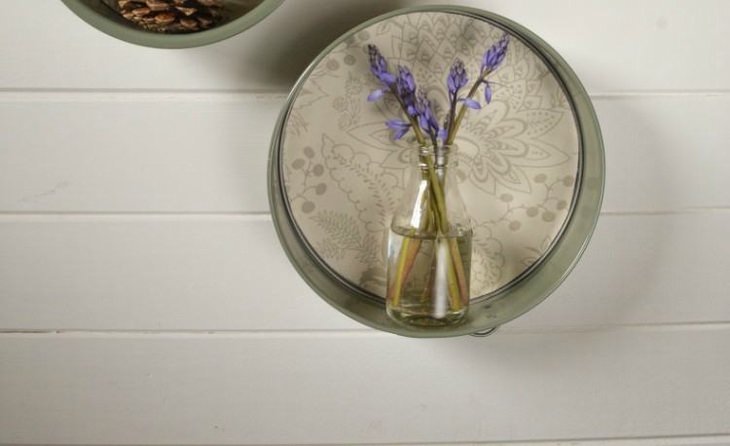
2. Cake Tin Floating Shelves
What you'll need
• Cake tins
• Sandpaper
• Wallpaper
• Adhesive – E3200
How to make them
1. Make sure your cake tins are clean and free from any traces of grease.
1. Draw around the tin bases on the wallpaper and trim it carefully. Double-check to make sure it fits.
3. Sand the base of the tins to break up the non-stick surface.
4. Clean the surface again to remove any leftover dust.
5. Apply the adhesive to the base of the tins.
6. Apply the wallpaper and weigh it down to prevent it from curling when it dries.
7. Hang the tins up on the wall and fill them with items of your choice.
3. Baking Sheet Chalkboard
4. Cake Pan Shade

What you'll need
• 3 springform cake pans (1 small, 1 medium and 1 large)
• 4 wire hangers
• Gold Spray Paint
• 50/50 vinegar and water mixture (optional)
• Paper towels (optional)
• 4 chains
How to make them
1. Clean up your cake pans to ensure they're free of dust and dirt.
2. Spray multiple layers of gold paint onto the cake pans in a well-ventilated area. Make sure you wear a mask or eye protection and allow 5-10 minutes between spraying each new layer. If you want to go for an older/rough look, squirt a light mist of water/vinegar mixture onto the paint, then blot the excess mixture off with a paper towel.
3. Leave the paint to dry for at least 24 hours.
4. Drill four evenly-spaced holes on the edge of the large cake pan. Repeat for the small and medium cake pans, then add 4 more holes on the opposite edge of each pan.
5. Cut two sections of wire hanger that are larger than the diameter of the medium cake pan. Repeat for the small cake pan. For the larger cake pan, cut four 3-inch pieces and use the wires to attach the cake pans to each other. Feed the wires through the small and medium pan to attach them, then curve the wire to loop the medium pan to the large one.
6. Attach the base (small cake pan) to the chains and hang as a pendant light in a location of your choice.
5. Disposable Cooking Tray Fish Craft
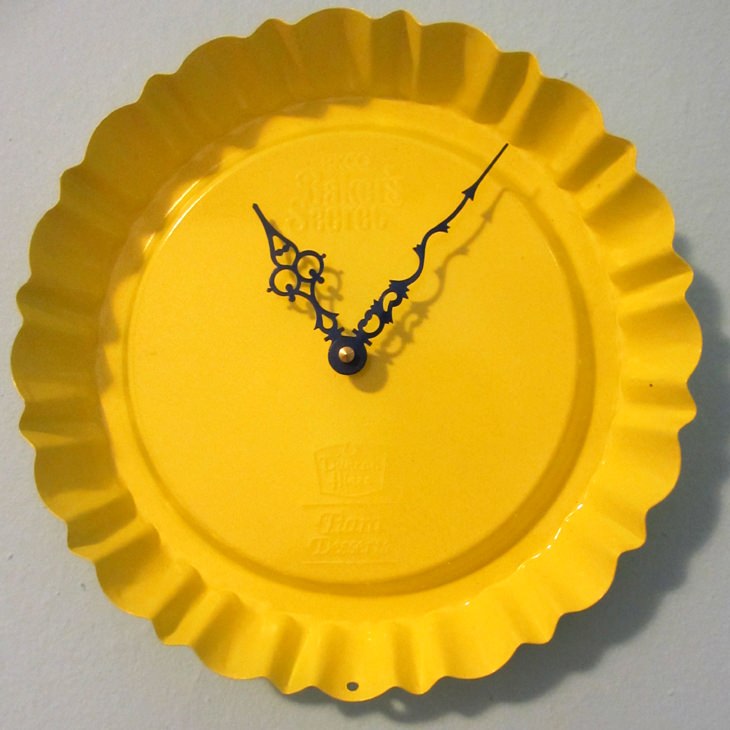
6. Dessert Pan Clock
What you'll need
• Antique dessert pan
• Spray paint in a color of your choice for the dessert pan
• Clock movement kit
• Spray paint in a color of your choice for the clock arms
• Drill
How to make them
1. Make sure that the antique dessert pan is free from dust and dirt.
2. Spray the antique dessert pan and leave it to dry for at least 24 hours.
3. Spray the arms that came with your clock movement kit.
4. Drill a hole in the center of the pan and assemble the clock movement kit using the instructions provided.
5. Hang your new dessert pan clock in a location of your choice.
7. Pie Tin Picture Frame
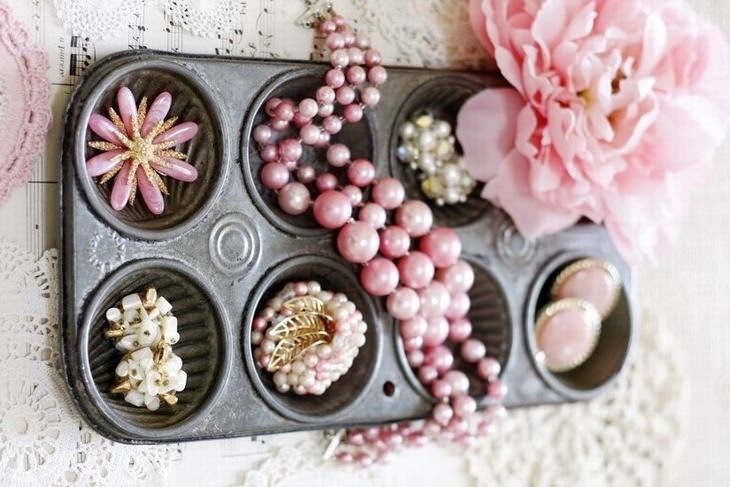
8. Muffin Tin Jewelry Organizer
What you'll need
• Muffin tin
• Your most colorful jewelry
• Pieces (such as artificial flowers) to dress the tin
How to make them
1. Place the jewelry pieces inside the different cavities of the muffin tin.
2. Add any pieces that you like to dress the tin.
3. Put the tin on display for you or your guests to admire.
9. Pie Tin Cake Stand
10. Cupcake Pan Advent Calendar
What you'll need
• Printable magnet sheets
• Paper cutter
• 24 mini cupcake pan
• Treats to place inside the pan's cavities
• Ribbon
• String to hang
How to make them
1. Select the designs you want for your magnet sheets online and print them out. Cut them out with a paper cutter.
2. Fill each cupcake cavity with a treat, then close them up with each magnet square.
3. Add ribbon or other trimmings around the edges to decorate.
4. Use the string to hang from a wall in your home (drill holes in the muffin tin if it doesn't have any already).