Drilling holes in tile doesn't have to be a nerve-wracking experience. With the proper tools and techniques, you can create clean, precise holes without damaging your beautiful tilework. Whether you're hanging a towel bar, installing a soap dish, or mounting a medicine cabinet, this comprehensive guide will show you how to drill through tile safely and successfully.
The first step to successful tile drilling is identifying what type of tile you're working with. Each variety has unique characteristics that affect how you should approach the job.
Ceramic tile is found in countless bathrooms, both old and new. Its softer composition makes it the easiest of the three main types to drill through, though you'll still need to use careful technique to avoid cracks.
Glass tile presents the biggest challenge due to its delicate nature. This material has a high risk of chipping and cracking, so it demands special drill bits and extra caution throughout the process.
Porcelain tile is manufactured from refined clay that's fired at extremely high temperatures, creating a harder, less porous surface than ceramic. While this makes porcelain more durable, it also makes it more difficult to drill through without specialized equipment.
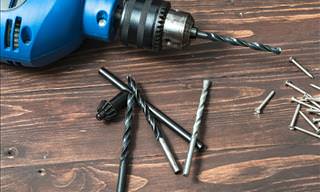
Your drill bit selection is the single most important factor in drilling tile successfully. For ceramic tile, a carbide-tipped masonry bit typically does the job well. These bits are engineered to handle tile's hardness and create clean holes that won't wear down quickly.
When working with porcelain or glass tile (or if you're unsure which type of tile you have), invest in a diamond-tipped bit. While they cost more upfront, these bits can penetrate even the hardest tiles effectively and are worth the investment for challenging materials.
Beyond the proper drill bit, assemble these items:
Remember: Never compromise on safety when working with power tools and tile.
Always wear safety glasses to shield your eyes from flying tile chips and sharp fragments. Work gloves protect your hands from sharp edges, while a dust mask is essential for protecting your respiratory system. Drilling ceramic releases silica dust that can cause serious chronic respiratory issues if you're exposed to too much of it over time.
Tile drilling generates substantial dust. Work in a well-ventilated space and keep a vacuum nearby to clean up dust promptly after you finish. You can also minimize airborne dust by using a water spray while drilling.
Mark Your Spots Carefully
Measure your drilling locations at least three times before making any marks. This ensures your holes end up exactly where you need them. When installing fixtures with multiple mounting points like towel bars, use a level to make sure everything aligns perfectly. As a general rule, aim to place holes near the center of tiles rather than close to edges, which crack more easily.
Before you start drilling, place a piece of masking tape over the drilling area. This adds tension to the surface and prevents your drill bit from sliding around. Mark your drilling spot directly on the tape.
1. If you're working with porcelain or glass, fill your spray bottle with water before you begin. Spray the drill bit and tile periodically as you work to control dust, prevent overheating, and reduce cracking risk.
2. Line up your bit with the mark you made, then start drilling slowly using light pressure. Patience is crucial here—rushing will only lead to cracked tiles and imprecise holes.
3. Once you've created an initial indentation, gradually increase both speed and pressure, but never go to full speed. Medium speed with steady, consistent pressure will get through the tile without overheating your drill. Continue spraying water on the area as needed.
4. When you feel the bit break through the tile's back surface, reduce pressure immediately. At this point, you can increase your drill speed to extend the hole into the drywall or backer board behind the tile with minimal risk of damage.
Sometimes you need to make bigger openings in tile to accommodate plumbing fixtures. The fastest approach is using a hole saw, though there's also an alternative method if you don't have one. For professional-quality results, use a carbide-grit hole saw. This specialized tool creates clean, circular cuts in tile efficiently, though it can be expensive if you won't use it regularly. You'll also need an arbor attachment to mount the hole saw to your drill.
1. Keep your water spray bottle ready to cool the working area.
2. Mark the center point of your hole, then attach the hole saw to your drill.
3. You can attach a drill bit to the arbor to help center the hole saw on your mark.
4. Begin drilling at low speed with light pressure to establish a guide mark.
5. Once the hole saw has cut in sufficiently, maintain your water spray while very gradually increasing speed. Keep pressure consistent until you've cut through the tile completely.
If you don't own a hole saw, this method works well too:
1. First, draw your hole's outline on the tile using a felt-tip pen or grease pencil. Next, use a ¼-inch masonry bit to drill a series of closely spaced holes around the circle's perimeter. Then, take a hammer and gently tap the tile along the ring of holes you've created.
Tap carefully inside the outline, being patient throughout the process. It may take several minutes for the center section to break free.
The resulting hole will have rough edges, but you can conceal them with a decorative escutcheon plate. This drill-and-tap technique also works for creating square or rectangular cutouts in tile.
When Tiles Crack
If a tile cracks while you're drilling, stop immediately. Minor cracks might be hidden by the fixture you're installing. More significant cracks, however, will require replacing the tile. Prevent future cracks by always using the correct bit for your tile type and following proper technique.
When your drill bit slips, it can create inaccurate holes or damage the tile. Prevent slippage by making sure your drill bit is sharp and suitable for your specific tile type. Apply masking tape to improve grip, and always start with light pressure when initiating the hole.
After drilling your holes, vacuum up all dust and debris, then wipe the area clean with a damp cloth. This cleanup is particularly important if you'll be applying adhesive or caulk later. Finally, install wall anchors as needed to properly support the weight of your fixtures.
While drilling through tile might seem daunting initially, it's entirely achievable when you understand your tile type, use the appropriate drill bit, and work patiently through the process. Always prioritize safety by wearing proper protective gear, and remember that taking your time will yield far better results than rushing through the job.