header print

Web Browsing Made Simple: How to Use the Autofill Feature

Whether you’re an avid online shopper or someone who loves hunting down all things interesting and fun on the internet, logging in and filling in online forms that require the same details is a routine, yet very time-consuming and annoying procedure.
Fortunately, most browsers are equipped with an autofill feature, which does exactly what the name entails: fills in the preset information like your shipping address, login info or name into the necessary fields in any form for you. This is a very convenient and customizable feature, which will speed up the annoying form-filling and logging in process considerably. Below we will explain how to work with the autofill feature in popular web browsers like Google Chrome, Mozilla Firefox, and Safari, plus a few handy and secure autofill apps.
autofill computers and internet login

How to Use the Autofill Feature in Google Chrome

When using Google Chrome, you can add autofill information about your address, phone number, but also login information and payment information. The browser will offer you to fill in the relevant info when you first click on any box in the form. Note that this works only for the forms in the web browser itself, and not other apps. Also, not all online forms enable autofill, so sometimes, you’ll have to submit the information manually.
Here’s how to find the autofill feature settings in Chrome:
autofill computers and internet chrome

Step 1. Open Google Chrome and click on the 3 vertical dots icon in the top right corner of your screen.

Step 2. A drop-down menu will appear. Find and click on the Settings. This will take you to the settings of your browser, and to continue, scroll down until you find the Autofill section.

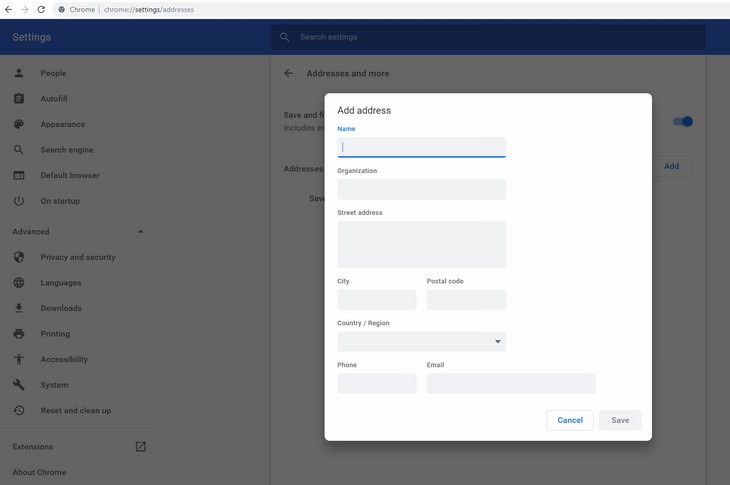
Step 3. In this section, you will see 3 lines: Passwords, Payments and Addresses and more. Each section will let you customize, enable or disable Chrome from filling in each type of information when browsing online, filling in forms and payment information, or logging into your account.

To illustrate how to add autofill information and enable/disable autofill in Chrome, let us demonstrate how to add an address to Chrome autofill.

autofill computers and internet add address chrome
To do so, first click on the Addresses and more line in the Autofill section, which will take you to a new window.
1. To disable this feature, simply click the blue slider next to "Save and fill addresses".
2. To add a new address, click the Add button on your right and an empty form like the one in the picture above will appear. Simply fill in the information you’d like to add and click Save when you’re done. That’s it!

How to Use the Autofill Feature in Mozilla Firefox

Like other browsers, Mozilla Firefox allows you to autofill addresses and login information, but the settings are a bit more nuanced and complex. For example, the address autofill option is available for users from the US only and there is no dedicated autofill section in the settings of the browser.
Furthermore, Mozilla Firefox automatically memorizes your form input in every website you use, including searched words and address information, but it’s impossible to customize these and they can only be limited or deleted manually. Below we explain how each of these features works:
autofill computers and internet Mozilla Firefox
1. Address Info. To enable, disable or edit autofill addresses in Mozilla, follow these steps:
Step 1. Open the browser, find the 3 horizontal lines on the top right corner of the browser. A drop-down menu will appear and you have to choose Options.
Step 2. Find the Privacy & Security panel, click on it and scroll down to Forms and Autofill. To enable address autofill, check the box next to "Autofill addresses" and uncheck it to disable it. To customize your addresses, click on Saved Addresses and choose to add, edit or remove each individual address and confirming the changes.
2. Login Info. To customize which login information to save, to enable or disable Firefox from saving your passwords automatically, you have to do the following:
Step 1. Open the browser, find the 3 horizontal lines on the top right corner of the browser. A drop-down menu will appear and you have to choose Options.
Step 2. Find the Privacy & Security panel, click on it and scroll down to Logins and Passwords (see image below). Firefox will automatically enable password saving, and to disable it, you must click on the checkbox next to "Ask to save logins and passwords for websites" once.
To manage your saved logins, you’ll have to click on the Saved Logins and choose to edit, remove or add logins and passwords.
autofill computers and internet mozilla firefox logins and passwords

3. Other Forms. As we mentioned, Firefox will automatically remember previous searches, addresses and any information you used to fill in a form and suggest it for you to reuse the next time you’re on that site. If you want to delete or disable this feature, follow these steps:

How to disable form autofill in Firefox

Step 1. Open the browser, find the 3 horizontal lines on the top right corner of the browser. A drop-down menu will appear and you have to choose Options.

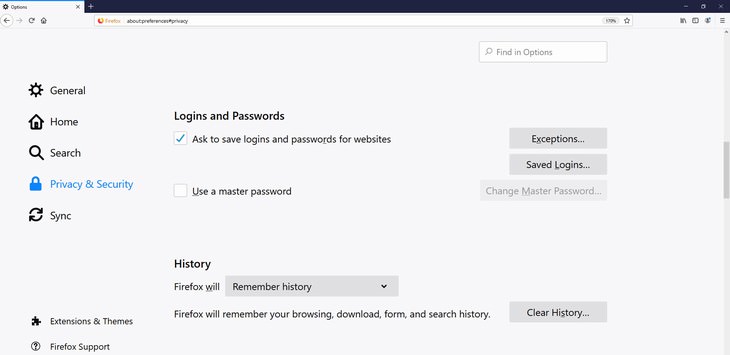
Step 2. Find the Privacy & Security panel, click on it and scroll down to Use custom settings for history

Step 3. Uncheck the box next to "Remember search and form history". That's all.

How to delete individual entries

Step 1. Go to the site and find the form, search box, etc. in question. Click on it and press the ↓ key, this will display the saved entries.

Step 2. Highlight the entry you wish to delete using the ↓ key or the mouse pointer and press Delete on your keyboard.

How to Use the Autofill Feature in Safari

Apple’s Safari allows you to customize autofill options across 4 main categories: your contacts, login information, credit cards, and other forms. To enable, disable or edit autofill information, follow these steps:
autofill computers and internet safari

Step 1. Open the browser and click on Safari in the browser menu. A drop-down menu will appear, and here you have to click on Preferences.

Step 2. In the Preferences section, find the Autofill icon. This will include 4 options, each accompanied by a checkbox and an Edit option (see image below). To enable auto-filling in the given category, the checkbox has to be checked, and to disable it, simply click on the checkbox once.

autofill computers and internet safari autofill
Image Source: SetApp

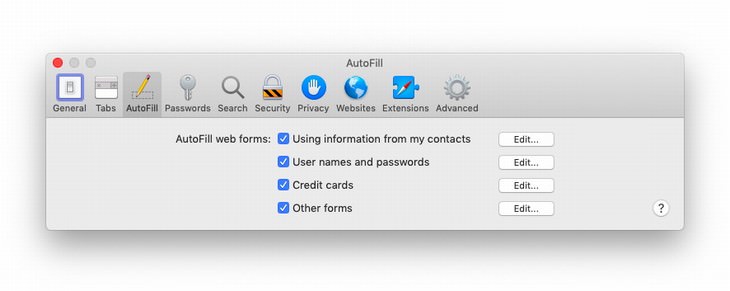
Let’s explain what each section does:

  • Using information from my Contacts: enables auto-filling details of your contacts.
  • User names and passwords: Manages the autofill settings for login info.
  • Credit cards: Stores and retrieves your credit card information.
  • Other forms: Refers to all the remaining information commonly used in forms, such as addresses, phone numbers, etc.

If you’d like to add, check or edit the information in any of these categories, click on the Edit button next to that section and proceed accordingly. For example, clicking on Edit next to "User names and passwords" will reveal the Password preferences window that allows you to view, change or delete saved login information for each individual site.

Specialized Autofill Apps

autofill computers and internet autofill apps

As we mentioned previously, browser autofill settings are limited to your web browser, but most of us also use various apps on our phones nowadays, and these, too, require you to fill in login information or shipping info. That’s what specialized autofill apps are for, as they can help you fill in the long forms and difficult-to-remember logins and passwords in a pinch.

A significant bonus of these apps is that they typically use an encryption method to make sure your passwords and personal info is safe from strangers. Most of these apps require only one master password for every use and can be used across multiple devices. Here are our recommended autofill app picks.

All of them offer free versions, are available for several types of operating systems and have paid extras that will let you connect multiple devices and share information with trusted people:

A Word of Caution

Autofill is a handy feature and it does save you a lot of time, but keep in mind that the information you’re submitting into your browser may be too private or sensitive for others to see. We prioritize your safety and thus recommend you use your personal information on your home computer and mobile phone only, and never enable autofill on your work computer or a device you use temporarily.


Click Here For More Internet Tips & Guides

Next Post
Sign Up for Free Daily Posts!
Did you mean:
Continue With: Google
By continuing, you agree to our T&C and Privacy Policy
Sign Up for Free Daily Posts!
Did you mean:
Continue With: Google
By continuing, you agree to our T&C and Privacy Policy