header print

How to Free Up Disk Space On a Pc and a Mac

Ensuring that a Windows computer or Mac has enough disk space in order for it to be able to operate correctly is absolutely vital, but do you know that there are various methods that you can employ to be certain that you'll never run out? Here are 5 ways of freeing up disk space on a Windows computer, followed by 5 ways of freeing up disk space on a Mac: 
 

Windows

1. Disk Cleanup

disk-space
Disk Cleanup is a built-in tool on Windows computers that deletes temporary files and other data that are unimportant or no longer needed. To use it, simply click on the Computer icon on your desktop, then right-click on the hard disk icon within Computer (usually this is C:). A drop-down menu will appear. Left-click on Properties in the drop-down menu. The General tab, which will be pre-selected, contains a button entitled Disk Cleanup. Left-click on it. You will be presented with a series of checkboxes. Check all the boxes pertaining to the different types of files that you would like to clear and left-click OK. A popup window will appear asking you to confirm that you wanted to delete the files you selected. Left-click Delete Files to complete the process.

2. Uninstall Applications (Programs)  

disk-space
To use this one, you need to click on the Computer icon on your desktop once again. Left-click on it. Next, you’ll see a button entitled Uninstall or change a program. Left-click and a list of all the applications and programs installed on your computer will appear. Note that there are various columns at the top of your screen that allow you to sort the list by various criteria. Left-click on the Size column to sort the list of applications and programs by the amount of data that they take up on your hard disk. Right-click on the program you wish to uninstall, then click Uninstall.

3. Analyze Disk Space with a Dedicated Program

disk-space

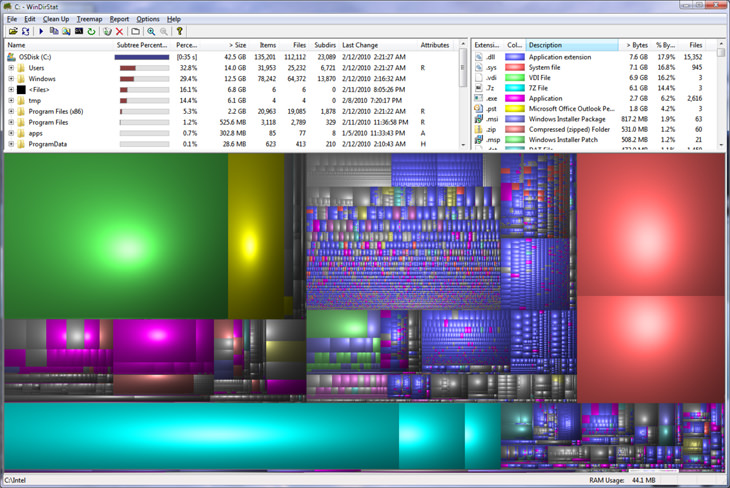
WinDirStat is an amazing tool for analyzing disk space. It shows you exactly which files and folders are using up the most disk space. You can use this tool to give you indications of what’s taking up a lot of disk space that you might not necessarily get from your computer’s Control Panel.


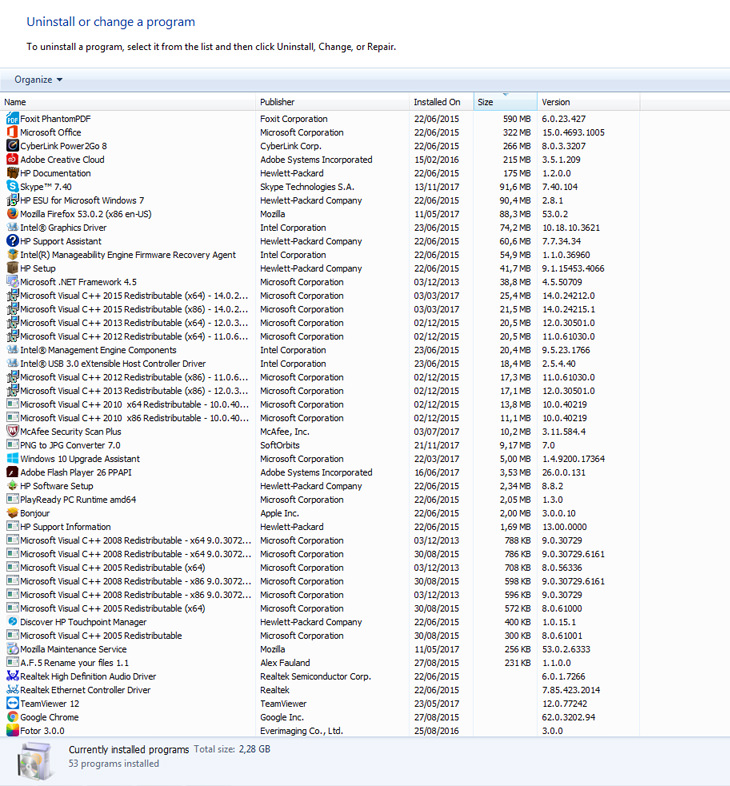
Handy Hint: You can uninstall any program that’s WinDirStat indicates to be located in your computer’s Program Files folder via the Uninstall or change a program tool outlined above.

4. Clean Temporary Files

disk-space
Although Windows’ built-in Disk Cleanup tool is very powerful when it comes to clearing unwanted files, it doesn’t clear temporary files that are used by programs such as web browsers. A great program to use for cleaning up temporary files is CCleaner. Download it, install it and run it to clean junk files from a variety of third-party programs and Windows files that Disk Cleanup couldn’t get to.

5. Reduce System Restore Space Allocation

disk-space
System Restore is a tool that allows your computer to be reset to a “restore point” in the event that a disaster happens, such as a hard disk crash. The problem with system restore points is that they can take up quite a bit of disk space. To adjust how much disk space is allocated to system restore points, left-click on the Computer icon on your desktop. Next, left-click on Control Panel, followed by System. On the right-hand side of your screen, you’ll see a button entitled System protection. Left-click on this for a pop-up window to appear. Under Disk Space Usage, there’s a slider that you can move in order to reduce the amount of disk space allocated to system restore.
 

MacOS

1. Use CleanMyMac 3

disk-space
CleanMyMac3 is a handy program that you can download for your Mac to avert having to find and clean up files and folders manually. Simply download, install and run it and allow it to do all the hard work for you.

2. Find and Remove Duplicate Files

disk-space
Duplicate files can become quite an issue if you’ve been using your Mac for a long time. Download the Gemini 2 app, which is perfect for finding and removing duplicate files thanks to its sleek and easy-to-use interface. It’s best if you download it from the manufacturer’s website, as this will allow you to use a free trial rather than having to pay for it immediately.

3. Empty Your Trash Can

disk-space
The Trash Can on a Mac is the equivalent of the Recycle Bin on a Windows PC, but something you may not know is that Macs can have multiple trash cans. Nevertheless, the main one can be found at the bottom right-hand corner of the dock on your Mac’s desktop. Left-click and hold down Ctrl for a pop-up window to appear. Select Empty Trash. This will clear the Trash Can. Note that your Mac will have trash cans for iPhoto, iMovie and Mail respectively (see screenshot below). To clear them, open each app in turn, Left-click on the trash can and hold down Ctrl and select Empty Trash.
disk-space

4. Uninstall Applications

disk-space
It’s inevitable that any applications you may have installed on your Mac are taking up space, so you should uninstall any you don’t need. You can do this by opening a Finder window and left-clicking Applications in the window’s sidebar. To remove any applications that you’re no longer using, simply drag-and-drop the application’s icon to the Trash Can on your Mac’s dock.

5. Clean Temporary Files

disk-space
Just as I outlined that you can use CCleaner for Windows to clear temporary files on a computer, there’s also a version of this great program for Mac. All you need to do is download, run and install the program, select the application that you want it to clear temporary files from, and let it do its thing. Keep in mind that clearing browser cache on a Mac is not recommended, so you might want to deselect your web browser when using CCleaner.
 
Content source: 1, 2
 
Next Post
Sign Up for Free Daily Posts!
Did you mean:
Continue With: Google
By continuing, you agree to our T&C and Privacy Policy
Sign Up for Free Daily Posts!
Did you mean:
Continue With: Google
By continuing, you agree to our T&C and Privacy Policy