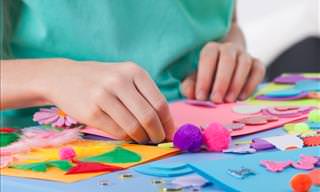
DIY crafts are suitable for all ages and give us the opportunity to spend family time doing something enjoyable with a rewarding end product. There are many materials from which you can create endless impressive crafts such as felt, pebbles and more, but have you ever thought to use buttons? Probably not, which is we invite you to read about 7 things you can make using buttons!
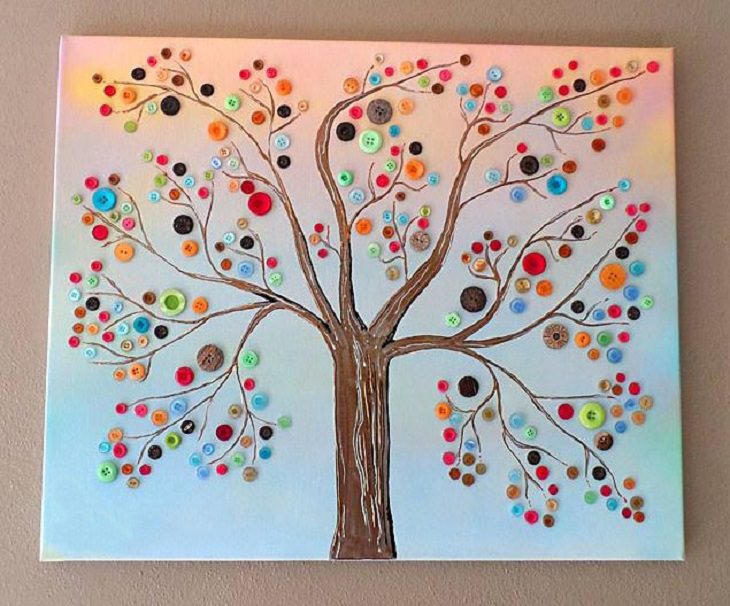
This picture will proudly hang in the most central place in your home since this amazing work will make anyone admire it and ask where you bought it. What a surprise it’ll be to them when you tell them you and your children made it one lovely Sunday afternoon!
Supplies:
How to:
If you decide to spray paint your canvas, start from step 1, otherwise skip and start from step 2.
1. Spread plastic sheeting over your work surface and place the canvas on top of it. After deciding on a color, begin carefully spray painting at a distance of about 20 cm (to make the colors lighter and duller, move slightly further away from the canvas). Allow the paint to dry for at least 30 minutes.
2. If you decide not to paint the canvas - or alternatively if you’ve already done step 1 and the paint is already completely dry – start drawing out your tree. First, draw the trunk and continue to the branches - first the thicker and then the smaller ones.
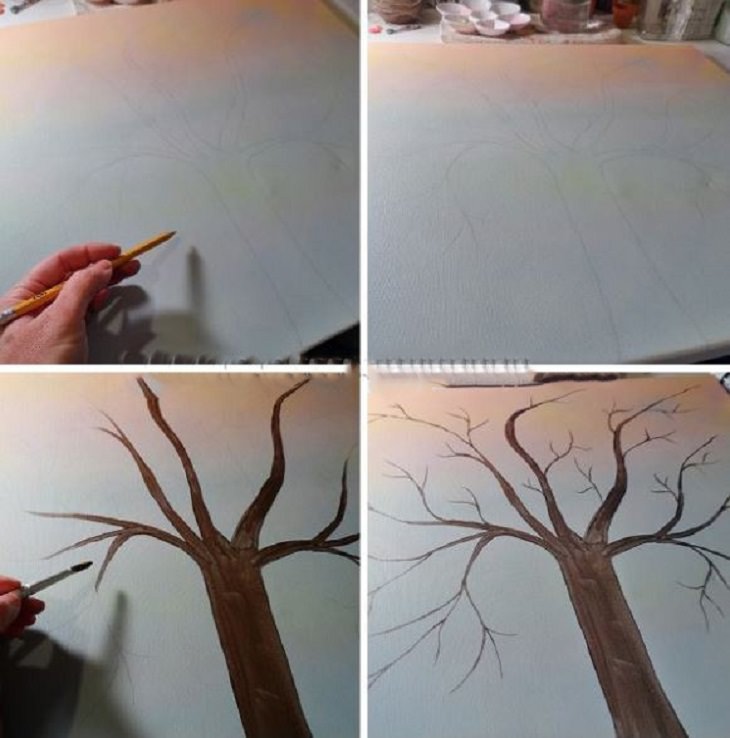
3. Using the tulip/acrylic paint, paint the tree you drew, and let it dry again.
4. Take the metallic color and paint thin lines on top of the painted tree trunk, from top to bottom, and add a few stripes in the branches to create depth. Allow to dry for a few more minutes.
5. Start gluing the buttons between and on the branches as if they were fruit or leaves. If you want to create a tree full of leaves glue the buttons close together, and if you want to depict a tree in the fall, reduce the number of buttons and scattered them throughout the tree.
6. When finished, leave the glue to dry and then hand it wherever you want.
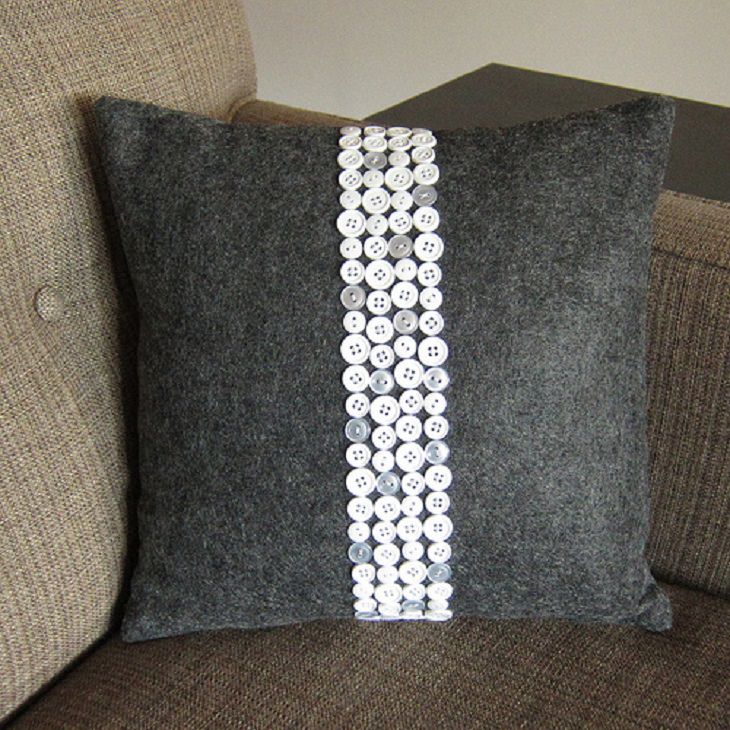
Are your living room pillows boring and need a revamp? Want to give your living room a more chic and fashionable look? This is the easiest and cheapest way to do so. It seems complicated, but it actually isn’t hard at all. After you finish making the first pillow, you won’t believe how easy it was.
Supplies:
How to:
1. Take one of the squares of fabrics, and make a straight line down its middle.
2. Start laying the buttons down both sides of the line to make sure they are straight. Leave about an inch empty at the top and bottom so that you can sew the two pieces of fabric together.
3. Once you’re happy with where the buttons are, glue them into place. You don’t need a lot of glue, and make sure you keep it out of the buttonholes.
4. Once the glue has dried, thread a needle and begin sewing the buttons, securing them onto the pillow even more. You don’t need to start a new with each button, just keep working down the buttons.
5. When you finish sewing the buttons, place the first piece of fabric on your work surface with the buttons facing down, and on top of it lay the second piece of fabric. Stick pins in the sides of the cloths to hold them together.
6. Sew three sides of the pillow, with a 1/2 inch seam. Place your pillow insert inside and sew the last side.
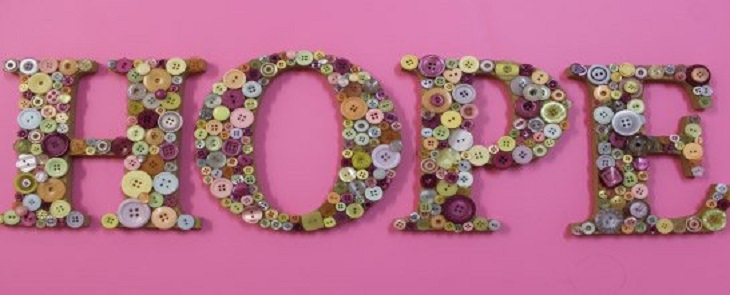
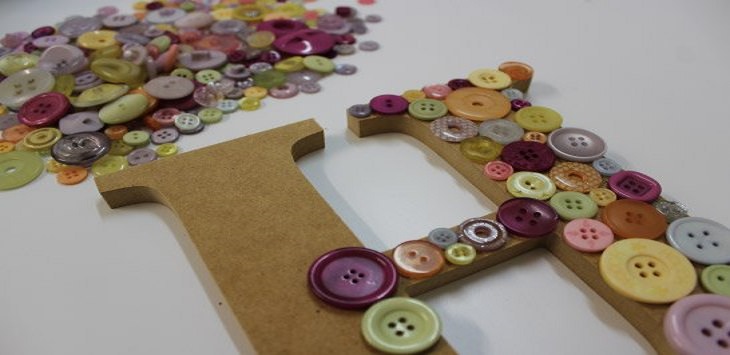
Inspirational words around the house such as “hope” or "Home Sweet Home" are always a welcome and warming touch. Instead of purchasing them you can make one on your own, allowing you to customize it in color and size to your home!
Supplies:
How to:
1. If you can’t find wooden letters, you can always take thick cardboard, draw out the letters you want, and cut them out with a box cutter.
2. Start laying and gluing your buttons from the top down.
3. Don’t be afraid to layer smaller buttons over larger buttons and really go crazy with those colors.
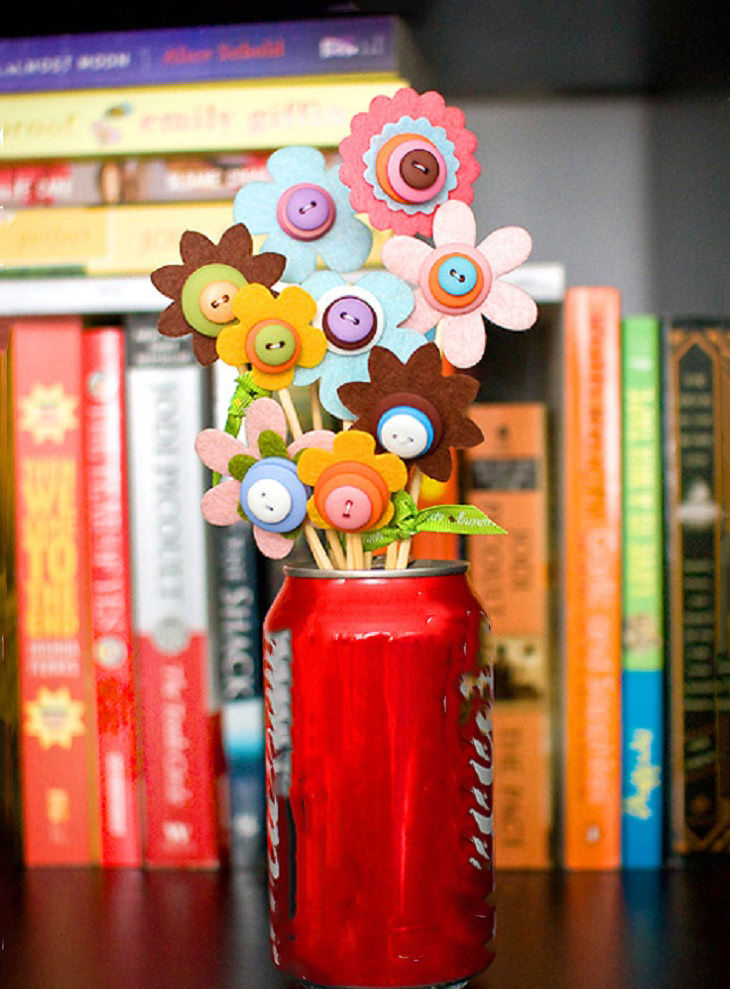
The next piece is one of the most beautiful and exciting gifts you could give a loved one. This bouquet is one of a kind and will last for years, unlike real flowers which wilt after a few days. So if there is someone you would like to show your love and appreciation to, take some time and make them this special flower bouquet.
Supplies:
How to:
1. If you do not want to paint the wood skewers that will serve as the "stems" of the flowers, you can skip this step. If you have decided to paint them, do so as follows: Mix the food coloring in a deep dish with water until the water turns green. Soak the skewers in the water for about 5-10 minutes, remove them and place on a towel to dry. During the soaking and drying, complete step 2.
2. Draw the flowers you want to make: chrysanthemums, roses, saplings and so on. Make the flowers in different sizes and colors, so you can glue a larger flower to a small flower of a different color. After you’ve finished drawing the different flowers in different sizes, cut the fabric as precisely as possible.

3. Glue smaller flowers onto larger flowers, and pace a button at their center.
4. Thread a needle and sew the button tight and secure.
5. When you finish sewing the button, glue the skewer onto the back of the flower to create the stem. If you want to make it more secure you can sew the button once more going over the skewer.
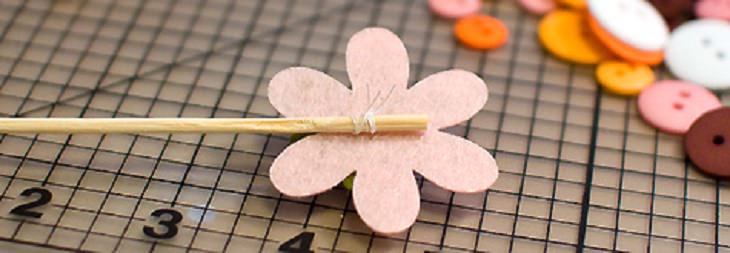
6. Cut off the extra thread and tie a ribbon in a bow shape right under the flower to make it look like leaves.
7. Make a few flowers with these instructions and place them in a can or vase.
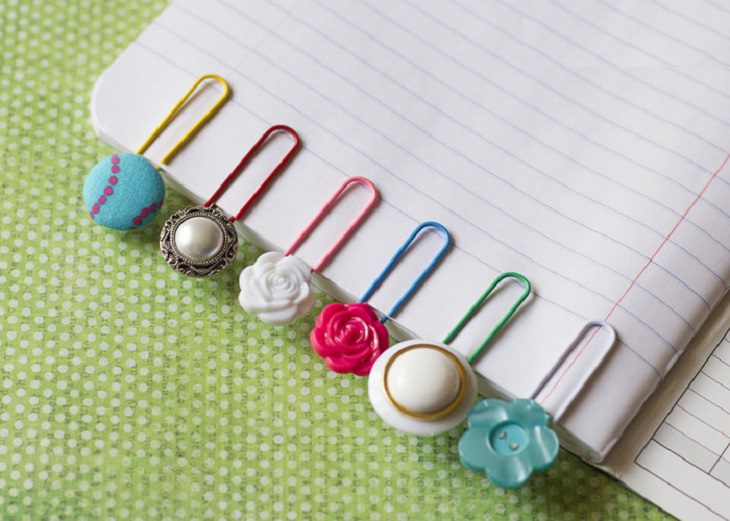
There is a well-known saying that "a good book is like a good friend" - and when you have a good friend that you love, you want to spoil them with gifts... which the next charming piece is perfect for.
Supplies:
How to:
1. If you use sweater or coat buttons with a loop in the back, you have to cut this loop and create a flat area.
2. Once you’ve removed the loops (if there were any), take a paper clip and a button, put some hot glue on the flat part of the button and quickly and carefully adhere it to the clip. Place the button with the clip on your work surface, with the adhesive facing up (so it doesn’t stick to the surface), and wait for it to dry.
3. Once the adhesive has hardened and the clip is fastened to the button, you can tie a ribbon to the clip or simply leave it as is.
4. Place the paper clip where you wish to mark in the book, and now you have a useful and special bookmark.
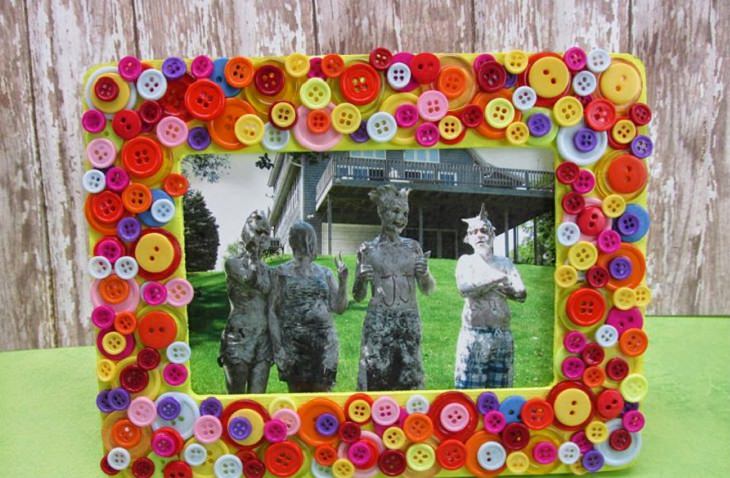
Do you have a picture that you want to frame, but are having a hard time finding the right frame for it? You can make one by yourself and customize the colors and design according to your taste.
Supplies:
How to:
1. Remove the glass gently from the frame and set it aside.
2. Paint the frame in the desired color or leave it plain.
3. If you have painted the frame - allow the paint to dry and then glue the buttons on the frame in any order you like. If you have not painted it, you can begin to glue the buttons after taking the frame apart.
4. Add more components to your work, or thicken the frame by adding an extra layer of buttons in the spaces created between the buttons in the first layer.
5. Allow to dry, place the glass in, ad your picture, close the back and hang on your wall!
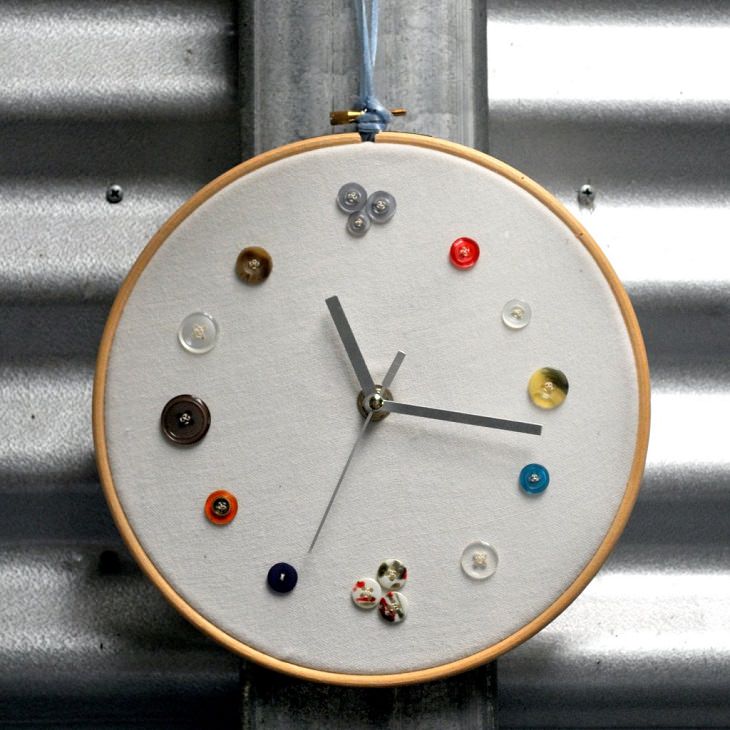
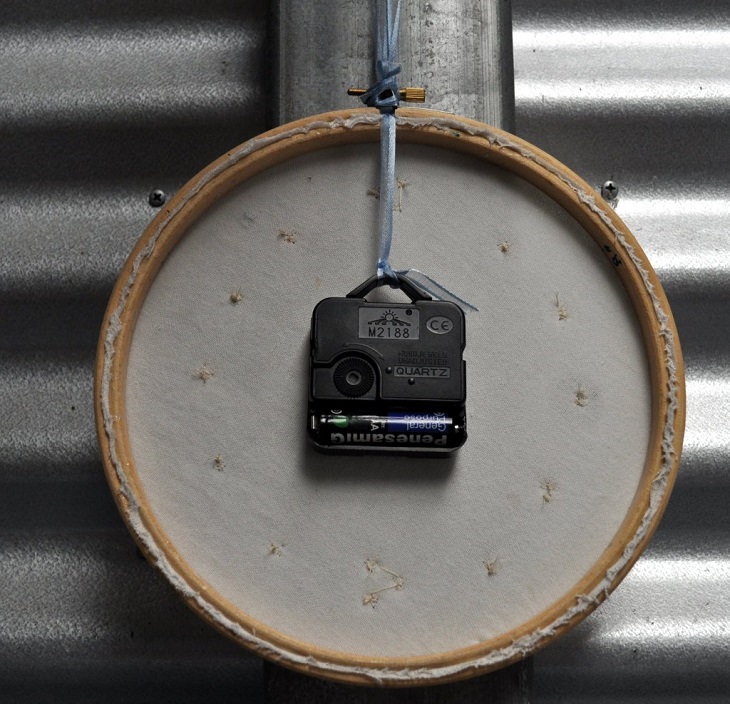
If you want to create a special vintage clock that will only be yours, you can do it easily with the guide below.