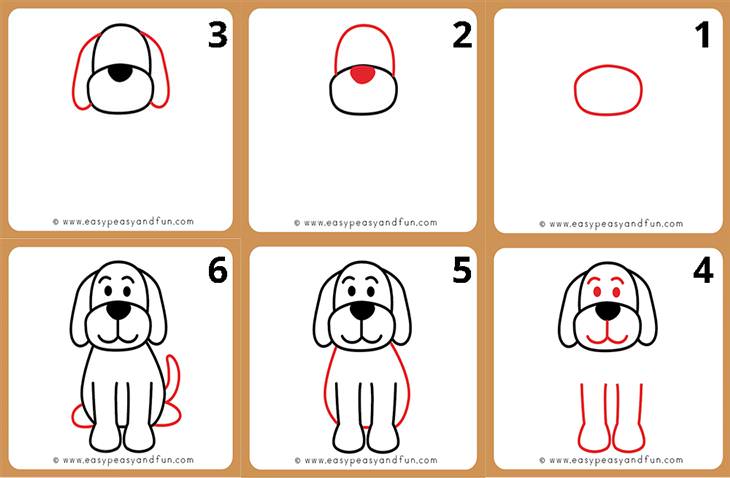
1. Dog
1. Start by drawing an oval shape. You can make a perfect oval or make it to be a bit more “boxy” - both will work just fine. This will be the snout.
2. Continue by making an inverted U shape above the oval you have previously drawn. This will be the head. Add a nose in the middle of your oval; it can be round or more of a triangular shape.
3. Draw the ears. We chose droopy ears, but they can also be pointy, button, or any other shape you want.
4. Let's finish up the dog's face. Draw two circles for the eyes and two arches above the eyes for the eyebrows. Add a straight line from the bottom of the nose and a wavy line for the mouth. Then, draw the front legs underneath the head.
5. For the body, draw a U shape that connects the head and the legs.
6. Last, but not least, draw two inverted Us at the bottom of the body - those are the hind legs. Finally, add a wiggly tail of your choosing!
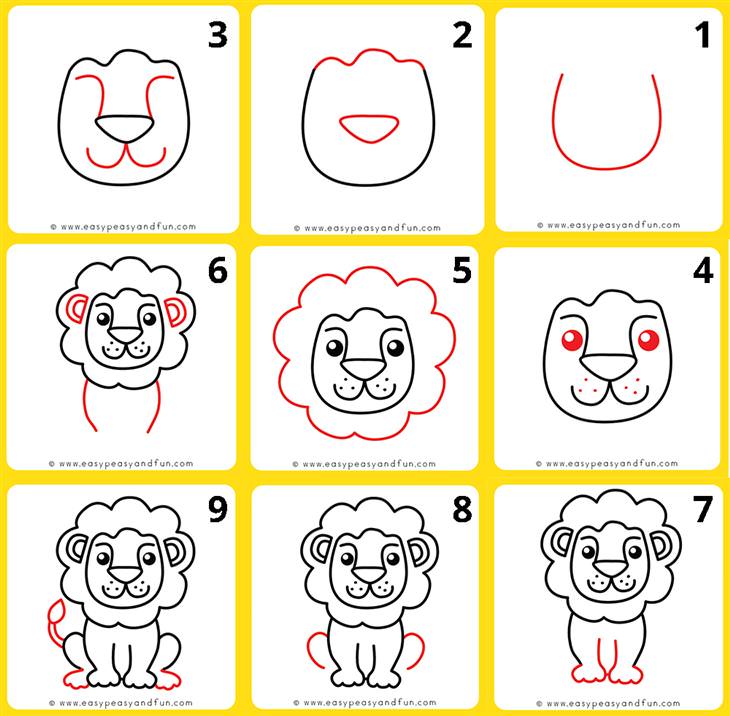
2. Lion
1. Start by drawing the head. Draw a U shape. Make the middle part slightly wider.
2. Connect the endpoints of your U shape with a wavy line. Then, draw a triangle with rounded edges for the nose.
3. Add two curved lines above the nose and two below.
4. Draw the eyes and a few dots underneath the nose.
5. Next comes the mane. Draw a wavy circle around the head.
6. Draw a pair of ears inside the mane. Then, add two curved lines coming down from each side of the head. They should look similar to brackets - ( ).
7. Next come the front legs. They should be attached to the two curvy lines you drew before.
8. Draw two halves of hearts on each side of the body. Those are the back legs.
9. Connect them to the front legs by another set of feet. Finish off with the tail.
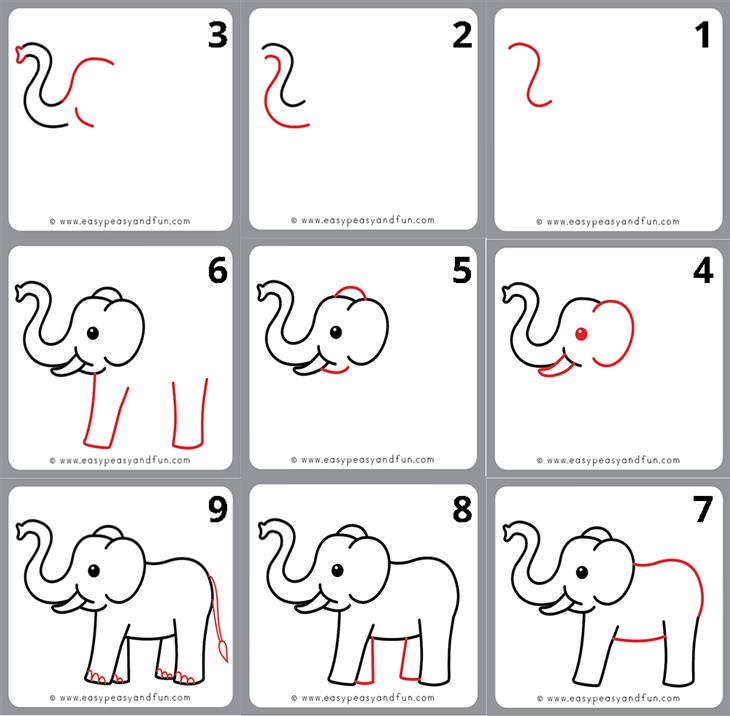
3. Elephant
1. Depending on the direction your elephant will be facing, either draw an S or a reversed S.
2. Draw another shape just like it underneath the first one. You can see the elephant's trunk forming.
3. Connect the two S-shaped lines to finish the trunk. Then, start drawing the elephant's head and a little 'lens' shape at the bottom of the head.
4. Draw a big C or revered C shape to create the ear. Add an eye and a tusk. Since this is a cartoon-like elephant, there is no need for “attention to detail.” However, if you want to be more specific, you can draw rounded ears for an African elephant or more triangular ears for an Asian elephant.
5. Draw a small half-circle at the top of the head. This is the second ear. Then, draw a line from the tusk towards the ear, but don’t make it all the way to the ear. And there you have it, your elephant's head is complete!
6. Draw two rectangles for the first pair of legs.
7. Make the belly by connecting the legs with a curved line. For the back, start a line from the middle of the ear and work your way to the back leg.
8. For the second pair of legs, add two halved rectangles next to each leg.
9. All there is left to do is add the tail and a few details, like small waves at the bottom of the legs for the elephant's fingers.
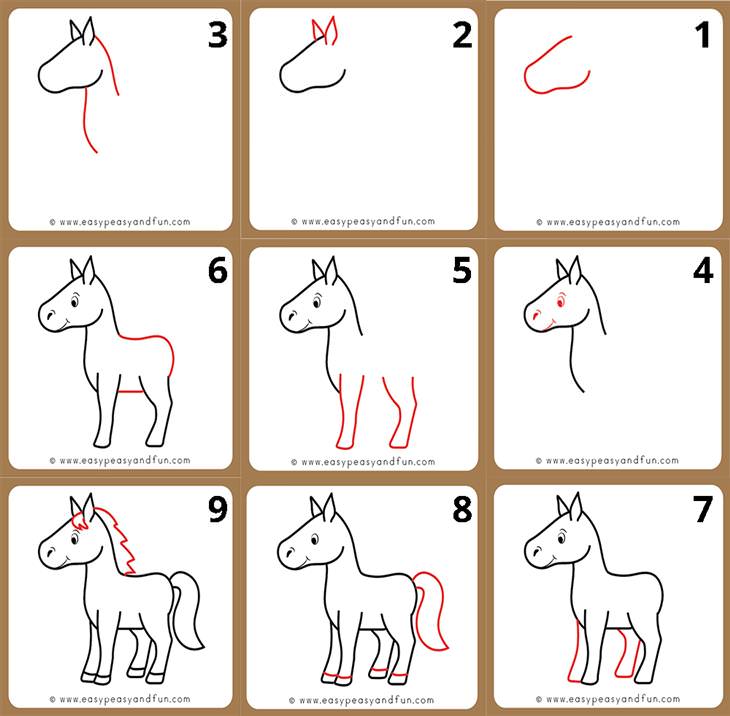
4. Horse
1. Start by drawing the head. The easiest way to do it is simply drawing a U shape. You could also make a shape similar to the ones shown in the picture above. This will bring you one step closer to mastering a realistic horse one day.
2. Add two pointy ears on top of the head.
3. Draw the neck.
4. Let's draw the facial features: the eyes, nostrils, and mouth.
5. Now, onto the legs. Start with the front leg, just a bit above the neckline, and draw a line downwards. Then move right and up back again, creating a rectangular shape. Next comes the hind leg. You can draw it in the same way you drew the front one or make it a bit more realistic (as shown in the photo).
6. Draw the back. Start by the neck arch, go down just a bit, and then move up again, as if you were to write the number two. Wrap it up by connecting the back to the leg. Then make the belly by drawing a line from one leg to the other.
7. Similarly to the way you drew the first pair of legs, draw the legs in the background.
8. Almost there! Draw lines at the bottom of the legs to make the hooves. Draw the tail by starting at the top and making a loop, as if you were writing a 'loose' number 2.
9. Finally, draw the mane. Start by the ear and zig-zag your way to the back. Also, draw a bit of the mane between the ears. All done!
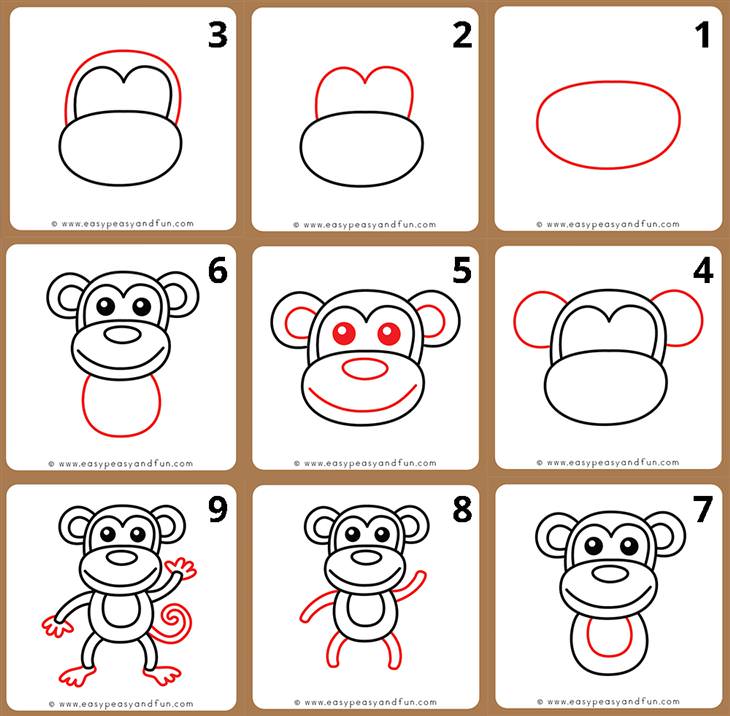
5. Monkey
1. Draw an elliptical shape (no need for it to be perfect).
2. Draw an M shape or an upside-down number 3 - two little bumps or hills.
3. Next, draw a rounded line around it. This will be the head.
4. Draw two ears on each side of the head.
5. Now, onto some facial details. Draw two smaller ear shapes inside the ears, a set of eyes, an elliptical or round nose, and a line for the mouth.
6. Attach a U shape under the head for the body.
7. Add a smaller U shape inside the bigger one.
8. Draw the limbs.
9. Add a twirly tail.
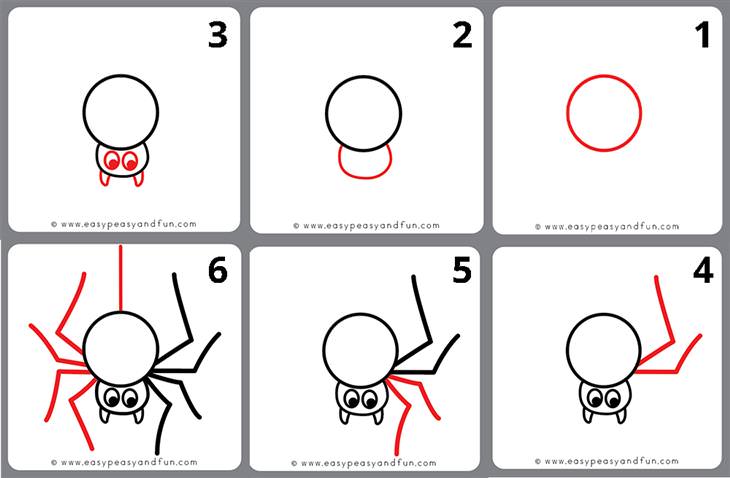
6. Spider
1. Start by drawing a big circle for the spider's body. Don't worry about making the circle perfect. An oval shape will work just as well.
2. Draw a wide U shape under the circle. This will become the spider's head.
3. Add a set of eyes and fangs (if you're going for a scary spider).
4. Draw two lines for the first set of legs.
5. Then, follow with the second pair that mirror the first two legs.
6. Repeat steps 4 and 5 on the other side.
7. If you want your spider hanging from a web, draw a straight line from its “backside.”
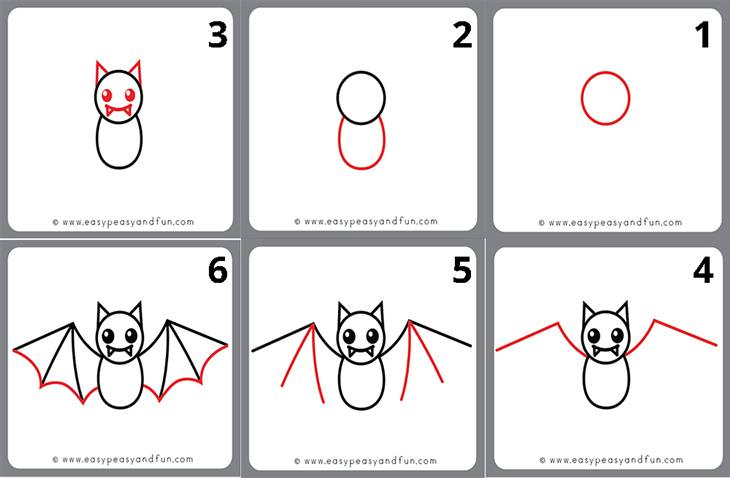
7. Bat
1. Start by drawing a circle for the bat's head.
2. Under the circle, draw an oval shape for the body of the bat.
3. Add two triangular pointy ears and facial details.
4. Draw a curved line starting at the point that joins the head and the body. This is the first step to drawing the wings.
5. Draw two lines starting from the pointy end of the wing. These will be the wing details.
6. Finally, add a wavy line at the bottom of the wings to finish them up.
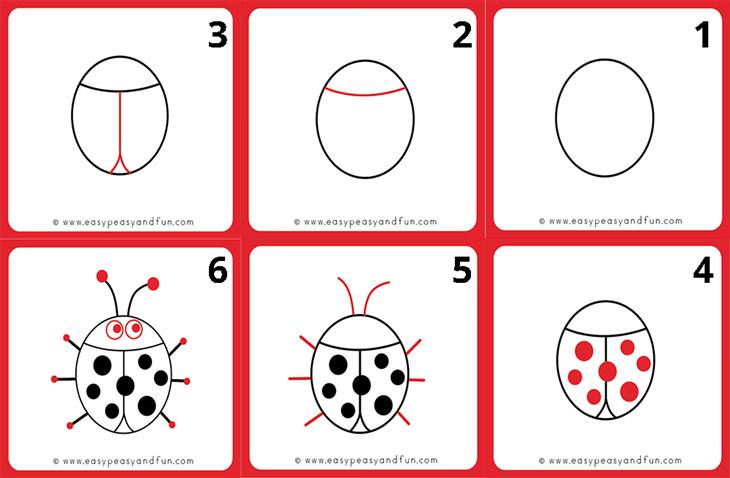
8. Ladybug
1. Start by drawing a circle or an oval shape. This will be the body of your ladybug.
2. Draw a curved line from right to left across the circle.
3. Draw a straight line from top to bottom – stop just before you reach the bottom of the oval. Draw a little triangle at the end.
4. Draw several dots. Ladybugs usually have around 7 spots, but you can draw any kind of quantity you want. If you decided to draw 7, draw one between both wings and 3 on each wing.
5. Draw antennae and legs. You can make the antennae straight, curvy, or even a bit spiral.
6. Draw the eyes. Then add dots at the ends of the antennae and legs. And there you have it, a complete ladybug!
9. Owl
1. Start by drawing an oval shape for the owl’s head.
2. Draw a triangle for a beak on the lower half of the oval.
3. Draw another oval or a “flat heart” shape starting from the beak.
4. Draw two big black circles for the owl’s eyes.
5. Continue by drawing two triangular shapes on top of the owl’s head to make the owl’s “ears.”
6. Draw a U shape underneath the head to make the body.
7. Add two curved lines on each side of the body for the wings.
8. Last touches – draw the feet and an inverted U shape inside the body to add detail to the owl’s body. All done! Now you can color the owl.
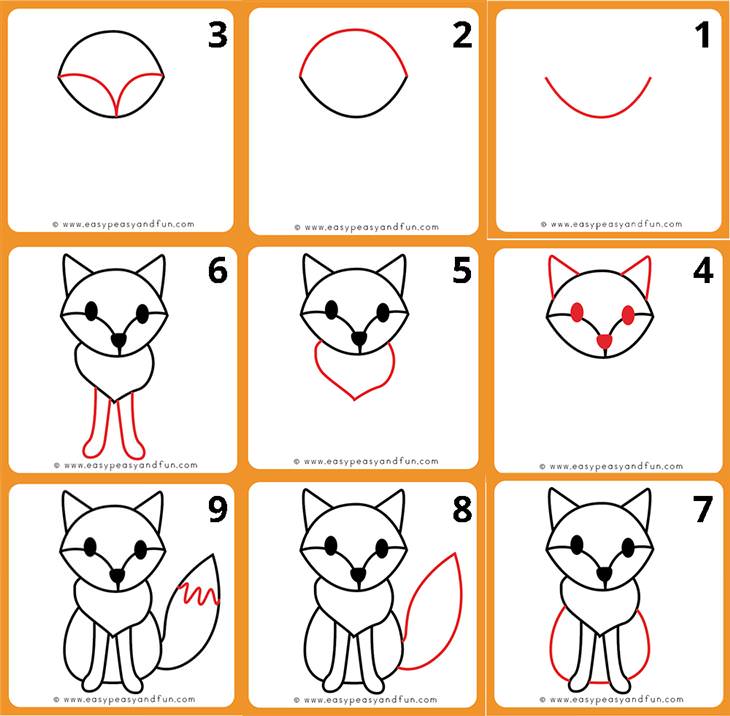
10. Fox
1. Start by drawing a sort of triangular “valley.”
2. On top of it, draw an arch. This completes the shape of the fox’s head.
3. Draw two arches on each side of the head.
4. Draw the ears and the facial features: the eyes, nose, and snout. Keep the shapes simple.
5. The shape beneath the head looks like the bottom part of a heart attached to the head.
6. Underneath it, draw two legs.
7. Draw an egg shape that connects the legs to the body.
8. Next comes the tail.
9. One last touch - add some details to the tail.
Share these fun drawing tutorials with others!